
We are assuming you are right-clicking on the wireless network icon in the system tray and selecting Connect to a Network and not seeing the secured wireless network you would like to connect to. We are also assuming that you are in range of that network, of course.
1. Right-click on the Network icon on the desktop and select Properties. The Network and Sharing Center will be displayed (you can also get here through the Control Panel).
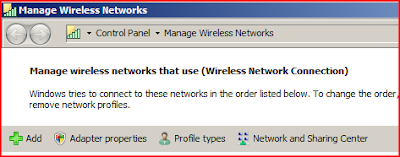
2. Under Tasks in the right column, select Manage Wireless Networks. Select Add.
3. Select Manually create a network profile.
 4. Input the secured wireless network name, the security type (WEP, WPA, etc). Type in the Security Key if it exists and check the check boxes for both Start this connection Automatically and Connect even if the network is not broadcasting. Select Next.
 5. If your wireless network requires a Security type setting other than open, such as Shared, WPA2, etc then select Change Connection Settings. Select the Security tab and change the Security type as appropriate. You will probably have to re-input the Network security key again. Select OK.
6. You will be back to the Manually connect to a wireless network screen. Select Connect to... and you should now be connected.
After completing these steps you find that you are connected to the network but are unable to access the Internet, disconnect from the wireless connection and reconnect. That should fix it.
